
Case Study: Seattle (Ballard/Fremont) Triplex – Permanent Waterproofing + Condition 3 Mold Remediation
Client: Greg Z. | Property: 1973 Triplex Condo (Daylight Basement, Poured Concrete) | Seattle, WA
Mold remediation: 07/21/2025–07/28/2025 | Waterproofing: 07/29/2025–08/19/2025
Overview
Greg Z. owned a 1973 triplex condo right on the Fremont/Ballard border in Seattle. The building is cut into a hillside with heavy clay soils and a daylight basement. That combination can create a perfect storm: saturated soils, rising water pressure, and water finding the path of least resistance—often right at the cold joint (where the wall meets the slab). Over time, the moisture load created Condition 3 mold growth (Stachybotrys) and elevated humidity that threatened both the remodel schedule and the future occupants’ health.
We were brought in at the right time: the units were already under renovation, unoccupied, and fully accessible. Our job was to remove the contamination correctly and install a permanent system that controls hydrostatic pressure at footing level—not just “seal” symptoms.
Project Snapshot
- Service: Interior footing drain waterproofing + Condition 3 mold remediation
- Location: Seattle, WA — Ballard/Fremont border
- Property: Triplex condo, built 1973
- Foundation: Poured concrete; daylight basement; finished basement
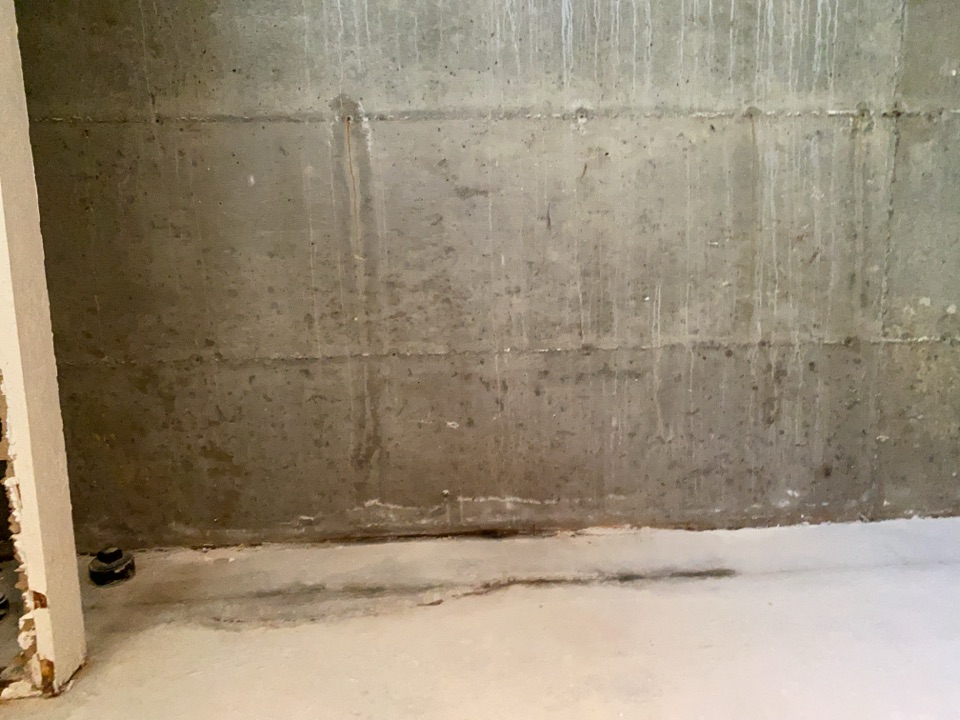
- Primary issues observed: Standing water, cold joint seepage, musty odor, visible mold, high humidity, efflorescence, cracks
- Mold remediation dates: 07/21/2025 – 07/28/2025
- Waterproofing dates: 07/29/2025 – 08/19/2025
- Site conditions: Unoccupied during remodel; strong access via garage; garage used for secure staging (theft/weather protection)
- System installed: Interior footing drain system + (2) catch basins + sump system + battery backup; discharge day-lighted to exterior dry well
- Outcome: Mold removed/remediated; basement dried; humidity stabilized; renovation could proceed without relying on dehumidifiers
- Warranty: Lifetime transferable (system-specific)
The Problem
This building had a long history of water intrusion. The owner tried multiple approaches—none of which solved the underlying physics.
- A DIY French drain using ABS piping had been attempted. It wasn’t designed for a high water table environment and didn’t relieve pressure at footing level.
- The owner also spent significant money on exterior waterproofing attempts, but water still penetrated through the cold joint and portions of the walls.
As the moisture load continued, conditions escalated from inconvenience to a building-health problem:
- Persistent seepage led to Condition 3 mold growth (Stachybotrys) on the uphill (east) basement wall.
- Moisture and contamination migrated into hallways, garage areas, and stair components.
- In one unit, moisture and elevated humidity contributed to mold spread into the first-floor kitchen and bathroom—creating legitimate health concerns for future occupants.
This wasn’t just about “a wet basement.” It was a system failure: water pressure + saturation + vulnerable building materials = ongoing damage and contamination.
Diagnosis (Root Cause)
From an engineering and hydrology standpoint, the pattern was consistent and repeatable:
- Hillside + heavy clay soils: Clay holds water, drains poorly, and maintains a saturated zone against the foundation for long periods.
- Cold joint seepage with rising events: Major seepage at the wall/slab junction strongly indicates the foundation is experiencing hydrostatic pressure and rising water table conditions.
- Likely failing or inadequate footing drainage: The symptoms fit a scenario where original perimeter drains (often old clay/concrete tile systems) are malfunctioning, crushed, silted-in, or were installed without proper filter fabric and free-draining gravel.
- Under-slab saturation + capillary movement: Flow under the slab saturated the subgrade and contributed to moisture wicking into interior sill plates and wall assemblies—excellent substrates for mold growth when sustained moisture is present.
Bottom line: sealing and patching won’t win against pressure. You have to relieve pressure and control the water at the footing level.
Permanent Solution
Other approaches were already tried. We didn’t repeat them.
We addressed the issue at the core—where the water pressure is acting—by installing a properly designed interior footing drain system tied into a sump catch basin and discharged to an exterior dry well.
The system is designed to:
- Intercept water at the footing line
- Relieve hydrostatic pressure before it reaches the cold joint
- Provide redundant pumping capability via battery backup
- Keep the basement environment stable so the remodel can be completed and remain healthy long-term
Installation
Mold Remediation (07/21/2025 – 07/28/2025)
Because this was Condition 3, the work required controlled removal—not surface “treatments.”
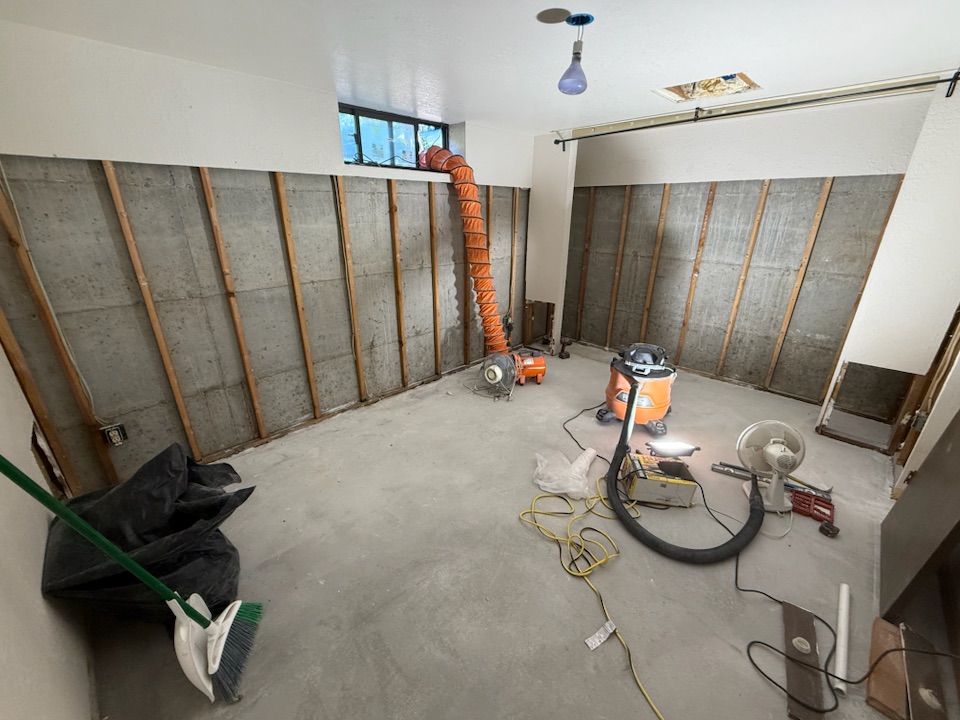
- Containment and engineering controls to prevent cross-contamination during demolition and cleaning.
- HEPA filtration and negative pressure (air scrubbers) to capture airborne particulates and support clean work practices.
- Source removal of impacted materials in the basement and affected first-floor bathroom/kitchen areas as required.
- HEPA vacuuming and detailed cleaning to remove settled spores and debris.
- Post-remediation verification (clearance confirmation) before rebuild.
Waterproofing / Interior Footing Drain (07/29/2025 – 08/19/2025)
- Controlled demolition: removed concrete along perimeter walls; wet saw cutting with vacuum capture for dust control.
- Perimeter trench excavation: continuous trench dug to appropriate depth with consistent slope toward collection points.
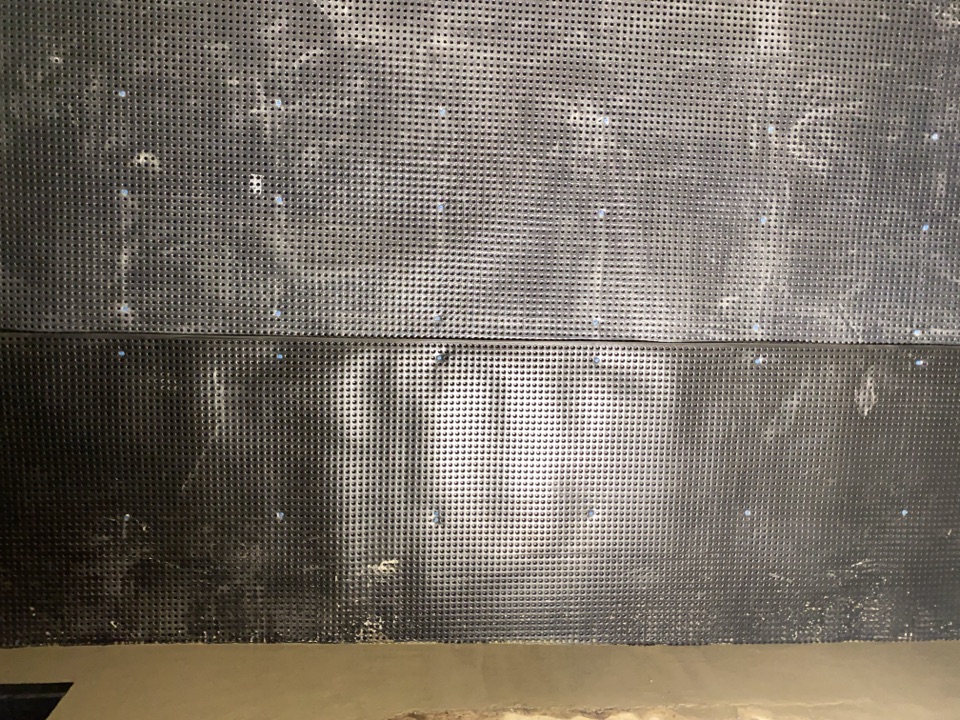
- Drainage assembly: installed 4-inch PVC drain pipe with geotextile filter fabric and washed drain gravel to preserve long-term flow and reduce silt intrusion.
- Collection points: routed drains to (2) catch basins due to the extent of the project footprint.
- Sump system + redundancy: installed sump catch basin with primary pump and battery backup system (marine battery + monitoring/charging station).
- Discharge strategy: day-lighted discharge to an exterior dry well to direct water away from the structure.
- Restoration: restored concrete for a build-ready surface for remodeling crews.
- Commissioning: tested pumps, verified float switches, and confirmed backup and alarm functions.
Operational note: We parked directly in front of the garage (primary access) and used the garage as a secure staging area to protect materials from theft and rain.
Basement Waterproofing
Before
After
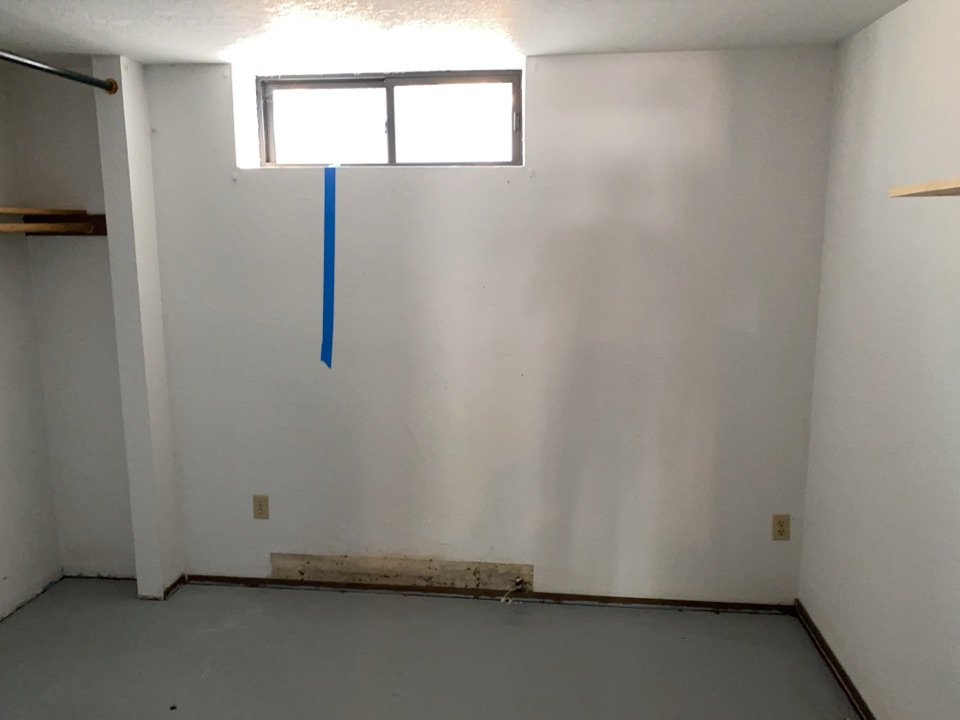
Mold Remediation
Before
After
Results
Before the project, the basement environment was not stable:
- Relative humidity exceeded 70% and climbed higher during rainy weather.
- Active seepage and standing water were present, along with visible mold growth and musty odor.
After remediation and installation:
- Post-remediation testing confirmed the space was clear (no elevated mold findings on clearance).
- Relative humidity stabilized below 50%.
- No water intrusion was observed after installation; sump pumps and backup system tested and operated flawlessly.
- Remodeling crews could proceed with finishes—this scope was a critical step that unlocked the renovation schedule.
A key outcome: the client considered installing dehumidifiers as a “necessary permanent solution.” After controlling the moisture source correctly, constant dehumidification was no longer needed as a crutch.
Warranty, Maintenance, and Next Steps
This project is protected by a lifetime transferable warranty (system-specific). The system is built around pressure control and reliable water management.
Backup protection:
- Protects against primary pump failure and power outages.
- Uses a marine battery with a monitoring/charging station.
- Includes an audible alarm and flashing indicator to alert the owner if something needs attention.
Recommended maintenance:
- Test pumps and alarm function periodically (especially before wet season).
- Check battery condition and replace per manufacturer guidance.
- Keep discharge path and dry well area clear and functioning.
If anything ever looks off, the client can call us any time. If needed, we can send a team member for inspection or servicing.
FAQ
Why was water coming in at the cold joint?
Because the cold joint is a natural pathway when hydrostatic pressure rises. If the soil is saturated and pressure builds outside/under the slab, water will express where resistance is lowest—often the wall/slab junction and cracks.
Why didn’t exterior waterproofing attempts solve it?
Coatings and membranes don’t remove water pressure. If drainage can’t relieve the water load, pressure remains and water finds a new pathway. A “seal” without drainage is often temporary at best.
What makes an interior footing drain system permanent?
It intercepts and redirects water at the footing line, lowering the pressure that causes seepage. The goal is pressure control and water management—not hoping the wall stays sealed forever.
Why install a battery backup system?
Power outages and storms often come together—the exact time pumps are needed most. Backup prevents a predictable failure scenario, especially in finished basements.
Do I still need dehumidifiers after waterproofing?
Not as a crutch. Once the moisture source is controlled and humidity stabilizes, dehumidifiers become optional rather than “required to survive.”
Call to Action
If your finished basement is taking on water—especially on a hillside—don’t wait until seepage becomes a tenant emergency or a mold problem. The permanent fix is pressure control and dependable drainage capacity.
Schedule a Free Professional Inspection: 425-877-0845
Schedule Your Free Inspection and Quote